Table of Contents
- Overview
- IPsec Brief
- Mikrotik & Linux VM With IPtables As SNAT Gateway
- Installation
- IPSec Tunnels Configuration
- Iptables Configuration
- Accessing On-Premise Services From Kubernetes Cluster
- Azure Firewall Configuration
- On-Premise Mikrotik Configuration
- Debugging IPSec Tunnels
- Enable DNAT on On-Premise Side
- Mikrotik advanced logging
- Mikrotik On-Premise Possible Workarounds
- FortiGate On-Premise Possible Workarounds
- Monitoring Ipsec Connections
- Azure Loadbalancer For Strongswan VM
- Azure Virtual Network Gateway & On-Premise Datacenter
- Optional extras
- Knowledge Section
- Links
- Azure Support
- Azure Alternatives
- AWS IPSec Tunnels
Overview
| Works | Source | Type | Target | Router | Technology |
|---|---|---|---|---|---|
| Yes | Azure Cloud Linux VM | S2S LAN | On-Premise | Mikrotik | Strongswan |
| Yes | Azure Cloud Linux VM | S2S SNAT IP -> LAN | On-Premise | Mikrotik | Strongswan and IPTables |
| Yes | Azure Cloud Linux VM | S2S SNAT IP -> DNAT IP | On-Premise | Mikrotik | Strongswan, IPTables and Mikrotik Firewall |
| Yes | Azure Cloud VNet | S2S LAN | On-Premise | Mikrotik | Azure VPN Gateway |
| ❌ No | Azure Cloud VNet | S2S SNAT | On-Premise | Mikrotik | Azure VPN Gateway, SNAT Egress Rules |
IPsec Brief
IPsec (Internet Protocol Security) is a suite of protocols used to secure Internet Protocol (IP) communications by authenticating and encrypting each IP packet in a communication session. It operates at the network layer (Layer 3) of the OSI model, which means it can protect all traffic crossing an IP network, regardless of the application.
Core Functions of IPsec
- Confidentiality – Encrypts data to prevent eavesdropping.
- Integrity – Ensures data is not altered during transmission.
- Authentication – Verifies the identities of the communicating parties.
- Anti-replay – Prevents attackers from re-sending captured packets.
IPsec protocols
AH (Authentication Header) Provides integrity and authentication. Does not provide encryption. Protects against spoofing and tampering. Protocol number: 51
ESP (Encapsulating Security Payload) Provides encryption, integrity, and authentication. Protocol number: 50
IPsec ports
UDP 500 and UDP 4500 are mandatory. Otherwise, tunnel will never establish.
ESP is optional if you use NAT-T (which StrongSwan normally negotiates automatically).
In most cloud setups (like Azure), ESP (IP protocol 50) often does not pass reliably — that's why NAT-T (UDP 4500 encapsulation) is the standard way.
You don't need to open any inbound ports unless partner wants to initiate tunnel.
Modes of Operation
Transport Mode Encrypts only the payload of the IP packet. Used for end-to-end communication (e.g., host to host). IP header remains visible.
Tunnel Mode Encrypts the entire IP packet. A new IP header is added. Commonly used in VPNs, especially between gateways (e.g., site-to-site).
Security Associations (SA)
An SA is a one-way logical connection that defines the parameters (keys, algorithms, etc.) for IPsec communication. Managed via IKE (Internet Key Exchange) – Negotiates SAs and key material. Two versions: IKEv1 and IKEv2.
Typical Use Cases
VPNs (Virtual Private Networks) for secure site-to-site or remote access. Secure communication over untrusted networks (e.g., Internet). Protecting data in government/military communications.
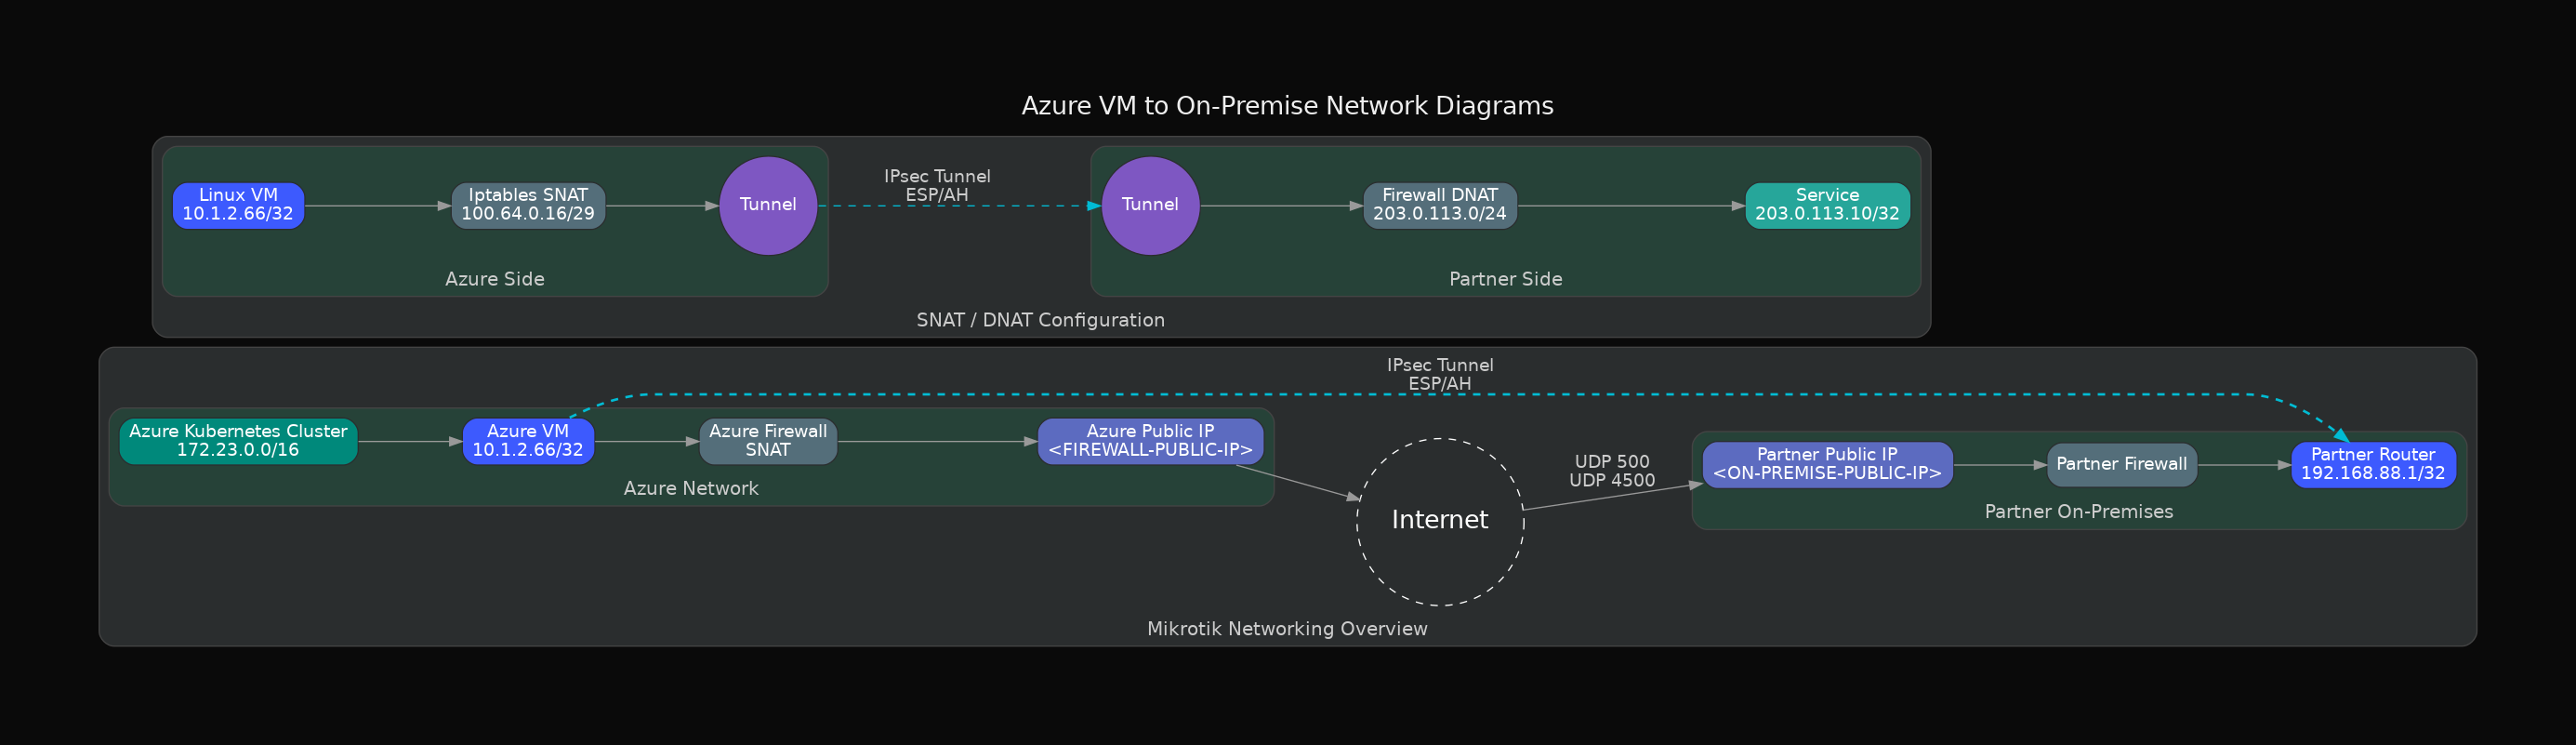
Mikrotik & Linux VM With IPtables As SNAT Gateway
This part contains a lots of azure- prefixes in connection names because Linux VM is hosted in Azure Cloud Vnet and all outbound traffic goes through Azure Firewall. For Azure Virtual Network Gateway connections related information check the next part called Azure Virtual Network Gateway & On-Premise Datacenter.
To enable ESP functionality, I needed to create a load balancer with NAT rules and configure a public IP for the VM in Azure Cloud. Azure Loadbalancer For Strongswan VM
Installation
This installs ipsec CLI tool, swanctl (for new config format, optional) and plugins for AES, SHA, IKEv2, NAT-T, etc:
$ sudo apt update
$ sudo apt install strongswan strongswan-pki libcharon-extra-plugins
$ sudo ipsec version
Linux strongSwan U5.9.5/K6.8.0-1027-azure
University of Applied Sciences Rapperswil, Switzerland
Enable Strongswan systemd service:
$ sudo systemctl enable strongswan-starter
$ sudo systemctl status strongswan-starter.service
○ strongswan-starter.service - strongSwan IPsec IKEv1/IKEv2 daemon using ipsec.conf
     Loaded: loaded (/lib/systemd/system/strongswan-starter.service; enabled; vendor preset: enabled)
     Active: inactive (dead) since Wed 2025-05-07 13:22:37 UTC; 1 week 1 day ago
   Main PID: 549 (code=exited, status=0/SUCCESS)
        CPU: 48ms
Default config files.
| File | Purpose |
|---|---|
/etc/ipsec.conf | Main tunnel configuration (legacy format) |
/etc/ipsec.secrets | Shared secrets or certificates |
/etc/swanctl/swanctl.conf | (If using modern swanctl format) |
Strongswan is logging to /var/log/syslog.
IPSec Tunnels Configuration
IPSec config setup /etc/ipsec.conf:
config setup
  charondebug="ike 2, knl 2, cfg 2, net 2, esp 2, dmn 2,  mgr 2"

conn tunnel-to-onprem
  keyexchange=ikev2
  auto=start
  type=tunnel
  authby=psk

  left=%defaultroute                    # This VM
  leftid=<AZURE FIREWALL PUBLIC IP>
  #leftsubnet=10.1.0.0/16               # Private subnet without SNAT
  leftsubnet=100.64.0.18/32             # SNAT

  right=<ON-PREMISE FIREWALL/ROUTER PUBLIC IP>
  rightsubnet=192.168.88.0/24           # On-premise LAN

  ike=aes256-sha256-ecp384
  esp=aes256-sha256

  ikelifetime=30m                 # 1800 seconds
  lifetime=30m                    # 1800 seconds
  rekeymargin=3m                  # Start rekey 3 minutes before expiry (safe default)
  rekeyfuzz=10%

  dpdaction=restart
  dpddelay=30s
  dpdtimeout=120s

  keylife=3600s
IPSec secrets /etc/ipsec.secrets:
<AZURE FIREWALL PUBLIC IP> <ON_PREMISE FIREWALL/ROUTER PUBLIC IP> : PSK "PASSWORD"
Iptables Configuration
Enable IP forwarding on the VM NIC and Linux OS. Add IPtables SNAT rules:
# Enable IP forwarding
echo 1 > /proc/sys/net/ipv4/ip_forward

# SNAT all traffic going to RabbitMQ
sudo iptables -t nat -A POSTROUTING -s 10.1.1.66/32 -d 192.168.88.1/32 -j SNAT --to-source 100.64.0.18
sudo iptables -t nat -S POSTROUTING
You can have several records for different target IPs:
sudo iptables -t nat -L POSTROUTING -n --line-numbers
Chain POSTROUTING (policy ACCEPT)
num  target     prot opt source               destination
1    SNAT       all  --  10.1.1.66            198.18.170.151       to:100.64.0.18
2    SNAT       all  --  10.1.1.66            192.168.88.1         to:100.64.0.18
To remove your IPTABLES rule:
sudo iptables -t nat -L POSTROUTING --line-numbers -n -v
sudo iptables -t nat -D POSTROUTING <RULE_NUMBER>
These rules are not persistent across reboots unless you save them.
Save to file:
iptables-save > /etc/iptables/rules.v4
Manually restore. This overwrites the current iptables ruleset with the contents of the file:
sudo iptables-restore < /etc/iptables/rules.v4
Dry-run to test file syntax:
sudo iptables-restore --test < /etc/iptables/rules.v4
Or use iptables-persistent:
sudo apt install iptables-persistent
When you need to insert rule before existing rule use -I instead of -A.
View current rules list:
sudo iptables -t nat -L POSTROUTING --line-numbers -n -v
These are an example, you don't need these rules to establish the tunnel! If the SNAT rule is rule 5, insert yours at position 5. These will now be evaluated before the SNAT rule.
sudo iptables -t nat -I POSTROUTING 5 -p udp --dport 500 -j RETURN
sudo iptables -t nat -I POSTROUTING 5 -p udp --dport 4500 -j RETURN
sudo iptables -t nat -I POSTROUTING 5 -p esp -j RETURN
To see forwarding rules and delete unneeded rule:
sudo iptables -L FORWARD -v -n --line-numbers
sudo iptables -D FORWARD <RULE-NUMBER>
To see prerouting rules and delete unneeded rule:
sudo iptables -t nat -L PREROUTING -v -n --line-numbers
sudo iptables -t nat -D PREROUTING <RULE-NUMBER>
Accessing On-Premise Services From Kubernetes Cluster
In cloud infrastructure assuming you have VNet 10.1.0.0/8 and at least two subnets 10.1.1.0/16 and 10.1.3.0/16. Strongswan IPSec Linux VM is located in 10.1.1.66/32 and the Kubernetes Cluster was deployed in 10.1.3.0/16. You have working NSG allowing Kubernetes nodes to establish network connections to 10.1.1.66/32.
On Linux VM enable DNAT rule to redirect traffic hitting Linux VM port to remote On-Premise datacenter:
sudo iptables -t nat -A PREROUTING -d 10.1.1.66 -p tcp --dport 15000 -j DNAT --to-destination <ON-PREMISE-DNAT-IP>:11453
If the IPsec policy expects traffic from 100.65.0.18, enable SNAT rule:
sudo iptables -t nat -A POSTROUTING -s 10.1.3.0/24 -d 91.147.80.35 -j SNAT --to-source 100.65.0.18
You may omit this only if your tunnel works with 10.1.3.0/16 Kubernetes subnet CIDR sources directly, but most IPsec setups require SNAT to a specific local subnet/IP.
Ensure IP forwarding is enabled:
echo 1 > /proc/sys/net/ipv4/ip_forward
sysctl -w net.ipv4.ip_forward=1
Azure Firewall Configuration
Azure Firewall should be configured to allow outbound IPSec connection and outbound HTTP connection through the tunnel.
resource "azurerm_firewall_network_rule_collection" "dev-main-fw-net-rule-collection-allow" {
  name                = "dev-main-fw-rule-collection-allow"
  azure_firewall_name = azurerm_firewall.dev-main-fw.name
  resource_group_name = data.azurerm_resource_group.main_rg.name
  priority            = 100
  action              = "Allow"

  # To establish IPSec tunnels
  rule {
    name = "strongswan-onprem-ipsec-dev"

    source_addresses = [
      "10.1.1.66/32",
    ]

    destination_ports = [
      "500",
      "4500",
    ]

    destination_addresses = [
      "<ON-PREMISE FIREWALL/ROUTER PUBLIC IP>",
    ]

    protocols = [
      "UDP",
    ]
  }
On-Premise Mikrotik Configuration
Mikrotik Firewall should be configured to allow inbound IPSec connection and inbound HTTP connection to its Webfig UI.
[admin@MikroTik] > /ip firewall filter print
 1    ;;; IPSec IKE and NAT-T - From Azure Strongswan VM through the Azure Firewall to Mikrotik
      chain=input action=accept protocol=udp src-address=<AZURE FIREWALL PUBLIC IP> dst-port=500,4500 log=no log-prefix=""
 2    ;;; IPSec IKE and NAT-T - From Azure Strongswan VM SNAT IP Allow HTTP access to Mikrotik
      chain=input action=accept protocol=tcp src-address=100.64.0.18 dst-port=80 log=no log-prefix=""
Creating peer on Mikrotik actions: Profile -> Peer -> Identity -> Proposal -> Policy.
Mikrotik IPSec Profile:
[admin@MikroTik] > /ip ipsec profile print
Flags: * - default
 0 * name="default" hash-algorithm=sha1 enc-algorithm=aes-128,3des dh-group=modp2048,modp1024 lifetime=1d
     proposal-check=obey nat-traversal=yes dpd-interval=2m dpd-maximum-failures=5

 1   name="azure-dev" hash-algorithm=sha256 enc-algorithm=aes-256 dh-group=ecp384 lifetime=30m proposal-check=obey
     nat-traversal=yes dpd-interval=2m dpd-maximum-failures=4
I show you 2 peers to indicate that Azure VPN Gateway has another Public IP address of it's own. For this VM based configuration use only peer id=0.
Mikrotik IPSec Peers:
[admin@MikroTik] > /ip ipsec peer print
Flags: X - disabled, D - dynamic, R - responder
 0     ;;; Azure VM Strongswan IPSec Connections
       name="azure-dev-firewall" address=<AZURE FIREWALL> local-address=<MIKROTIK> profile=dev
       exchange-mode=ike2 send-initial-contact=yes

 1     ;;; Azure VPN Gateway Connections
       name="azure-dev-vpn-gateway" address=<AZURE VPN GATEWAY> local-address=<MIKROTIK> profile=dev
       exchange-mode=ike2 send-initial-contact=yes
Important: You should consider 2 facts about Azure Virtual Network Gateway:
- Azure VPN Gateway connection traffic is bypassing the Azure Firewall!
- Azure VPN Gateway will not send traffic selectors if you attach at least one SNAT Egress rule to Gateway Connection.
Mikrotik IPSec Indentity:
[admin@MikroTik] > /ip ipsec identity print
Flags: D - dynamic, X - disabled
 0    peer=azure-dev-firewall auth-method=pre-shared-key secret="<PASSWORD>"
      generate-policy=no

 1    peer=azure-dev-vpn-gateway auth-method=pre-shared-key secret="<PASSWORD>"
      generate-policy=no
Mikrotik IPSec Proposals:
[admin@MikroTik] > /ip ipsec proposal print
Flags: X - disabled, * - default
 0 X* name="default" auth-algorithms=sha1 enc-algorithms=aes-256-cbc,aes-192-cbc,aes-128-cbc lifetime=30m
      pfs-group=modp1024

 1    name="azure-dev-strongswan" auth-algorithms=sha256 enc-algorithms=aes-256-cbc lifetime=30m pfs-group=ecp384
Mikrotik IPSec Policy:
[admin@MikroTik] > /ip ipsec policy print
Flags: T - template, B - backup, X - disabled, D - dynamic, I - invalid, A - active, * - default
 #      PEE TUN SRC-ADDRESS                                   DST-ADDRESS                                   PROTOCOL
 0 T X*         ::/0                                          ::/0                                          all
 1   XI ;;; Azure Strongswan VM + Firewall
        far yes 192.168.88.0/24                               10.1.0.0/16                                   all
 2   A  ;;; Azure Strongswan VM + Firewall + SNAT
        far yes 192.168.88.0/24                               100.64.0.18/32                                all
Mikrotik IPSec Policy (Detailed):
[admin@MikroTik] > /ip ipsec policy print detail
Flags: T - template, B - backup, X - disabled, D - dynamic, I - invalid, A - active, * - default
 0 T X* group=default src-address=::/0 dst-address=::/0 protocol=all proposal=default template=yes

 1   XI  ;;; Azure Strongswan VM + Firewall
        peer=azure-dev-firewall tunnel=yes src-address=192.168.88.0/24 src-port=any dst-address=10.1.0.0/16
        dst-port=any protocol=all action=encrypt level=require ipsec-protocols=esp sa-src-address=<MIKROTIK>
        sa-dst-address=<AZURE FIREWALL> proposal=azure-dev-strongswan ph2-count=0

 2   A  ;;; Azure Strongswan VM + Firewall + SNAT
        peer=azure-dev-firewall tunnel=yes src-address=192.168.88.0/24 src-port=any dst-address=100.64.0.18/32
        dst-port=any protocol=all action=encrypt level=require ipsec-protocols=esp sa-src-address=<MIKROTIK>
        sa-dst-address=<AZURE FIREWALL> proposal=azure-dev-strongswan ph2-count=1
Debugging IPSec Tunnels
Establish your IPSec connection:
sudo ipsec restart
sudo ipsec up tunnel-to-onprem
sudo ipsec statusall
- ip xfrm state:
If ipsec statusall shows the tunnel is up and installed, StrongSwan should already install a policy-based route for 198.18.170.151.
Linux IPsec kernel-level policy shows what traffic should be encrypted (src/dst match, direction).
sudo ip xfrm policy
src 100.64.0.18/32 dst 198.18.170.151/32
	dir out priority 367231
	tmpl src 10.1.1.66 dst <MIKROTIK PUBLIC IP>
		proto esp spi 0x0e8ba0aa reqid 1 mode tunnel
src 198.18.170.151/32 dst 100.64.0.18/32
	dir fwd priority 367231
	tmpl src <MIKROTIK PUBLIC IP> dst 10.1.1.66
		proto esp reqid 1 mode tunnel
src 198.18.170.151/32 dst 100.64.0.18/32
	dir in priority 367231
	tmpl src <MIKROTIK PUBLIC IP> dst 10.1.1.66
		proto esp reqid 1 mode tunnel
src 0.0.0.0/0 dst 0.0.0.0/0
	socket in priority 0
src 0.0.0.0/0 dst 0.0.0.0/0
	socket out priority 0
src 0.0.0.0/0 dst 0.0.0.0/0
	socket in priority 0
src 0.0.0.0/0 dst 0.0.0.0/0
	socket out priority 0
src ::/0 dst ::/0
	socket in priority 0
src ::/0 dst ::/0
	socket out priority 0
src ::/0 dst ::/0
	socket in priority 0
src ::/0 dst ::/0
	socket out priority 0
SNAT is working as intended. Your policy says:
src 100.64.0.18/32 dst 198.18.170.151/32 dir out
  tmpl src 10.1.1.66 dst <MIKROTIK PUBLIC IP>
This means that traffic from 100.64.0.18 (SNATed source) to 198.18.170.151 is tunneled from 10.1.1.66 (your VM) → <MIKROTIK PUBLIC IP> (the on-prem public IP). So the xfrm policy is installed, and StrongSwan is doing what it should.
Linux IPsec kernel-level state shows active Security Associations (SAs) — i.e., encryption/auth settings and tunnel endpoints.
sudo ip xfrm state
src 10.1.1.66 dst <MIKROTIK PUBLIC IP>
	proto esp spi 0x0e8ba0aa reqid 1 mode tunnel
	replay-window 0 flag af-unspec
	auth-trunc hmac(sha256) 0xdf9329eb305f22e403c9fc5c4b94488206398505f6d274ddbbdec8b844611a8f 128
	enc cbc(aes) 0x59d4e0109dfa4a81110572984b3adc9c272c256e142e42c869888cd920259c30
	anti-replay context: seq 0x0, oseq 0x0, bitmap 0x00000000
src <MIKROTIK PUBLIC IP> dst 10.1.1.66
	proto esp spi 0xc08ea295 reqid 1 mode tunnel
	replay-window 32 flag af-unspec
	auth-trunc hmac(sha256) 0xf627f165060d7e5382f8520cba0e45b397f99105c733a866bfbaab7de6a183da 128
	enc cbc(aes) 0xb708741b7c8e1c4e4b6b770368cdbb0c3a9efc8345b922f7933d45ace2ddd28b
	anti-replay context: seq 0x0, oseq 0x0, bitmap 0x00000000
Linux does not create a separate ipsec0 interface for StrongSwan tunnels — IPsec in Linux is handled by the XFRM framework, which works at the kernel level and transparently intercepts traffic based on policy.
Ensure SNAT is being hit by running nc -zv 198.18.170.151 5672 and iptables in parallel terminal sessions:
sudo iptables -t nat -L POSTROUTING -n -v --line-numbers
num   pkts bytes target     prot opt in     out     source               destination
1      178 10672 SNAT       all  --  *      *       10.1.1.66            198.18.170.151       to:100.64.0.18

You will see packets counter (pkts) value changed:
```bash
sudo iptables -t nat -L POSTROUTING -n -v --line-numbers
num   pkts bytes target     prot opt in     out     source               destination
1      195 11692 SNAT       all  --  *      *       10.1.1.66            198.18.170.151       to:100.64.0.18
That means your VM is generating traffic to 198.18.170.151. The traffic is correctly SNATed to 100.64.0.18. StrongSwan should pick it up via the XFRM policy and encrypt it into ESP.
If you still see no ESP/UDP traffic on eth0, even while SNAT counters increase → the XFRM policy is silently dropping packets.
The nft is used to display the full active nftables firewall configuration on a Linux system.
sudo nft list ruleset
table ip security {
	chain OUTPUT {
		type filter hook output priority 150; policy accept;
		meta l4proto tcp ip daddr 168.63.129.16 tcp dport 53 counter packets 0 bytes 0 accept
		meta l4proto tcp ip daddr 168.63.129.16 skuid 0 counter packets 85410 bytes 42838449 accept
		meta l4proto tcp ip daddr 168.63.129.16 ct state invalid,new counter packets 0 bytes 0 drop
	}
}
table ip nat {
	chain POSTROUTING {
		type nat hook postrouting priority srcnat; policy accept;
		ip saddr 10.1.1.66 ip daddr 198.18.170.151 counter packets 215 bytes 13012 snat to 100.64.0.18
	}
}
Key difference between Stronswan IPSec from Linux VM and Azure VPN Gateway connections is that Azure needs IPSec ESP 50 protocol. So there must be additional Mikrotik Firewall input chain rule for that.
Now you can ping 192.168.88.1 but still can not access port 80 on this address. Why? Because you have now input chain for 10.1.0.0/16 -> 192.168.88.1:80 on your Mikrotik Firewall.
Enable DNAT on On-Premise Side
Create DNAT Rule on Mikrotik Firewall:
[admin@MikroTik] > /ip firewall nat print where chain=dstnat
Flags: X - disabled, I - invalid, D - dynamic
 0    ;;; Product Dev Strongswan VM
      chain=dstnat action=dst-nat to-addresses=192.168.88.1 to-ports=80 protocol=tcp src-address=100.64.0.18 dst-address=203.0.113.10 dst-port=8080
      log=no log-prefix=""
192.168.88.1is a MikroTik private IP address in LAN.100.64.0.18is a Azure VM SNAT IP address (IPTables postrouting).203.0.113.10is a Mikrotik DNAT address.
When you are using SNAT & DNAT the IPSec peer must have 2 policies enabled. Without rule 2 the reply is going directly to 100.64.0.18, bypassing the IPsec tunnel. The reply path is not encrypted, no matching outbound IPsec policy from 192.168.88.1 → 100.64.0.18. As a result, your Azure VM never gets the HTTP payload when you are trying to curl -Lv 203.0.113.10:8080, curl hangs because the response is lost.
 1      ;;; Azure Strongswan VM + Firewall + SNAT + DNAT (Establishing tunnel)
        far.. yes 203.0.113.0/24                                 100.64.0.18/32                                 all        encrypt require          0
 2      ;;; Azure Strongswan VM + Firewall + SNAT + DNAT (Additional policy for DNAT)
        far.. yes 192.168.88.1/32                                100.64.0.18/32                                 all        encrypt require          0
Inbound traffic to 203.0.113.10:8080 hits policy 1 → encrypted → DNATs → 192.168.88.1:80. Reply traffic from MikroTik 192.168.88.1 hits policy 2 → encrypted → back to 100.64.0.18.
Configure input chain for 100.64.0.18 SNAT IP address from Azure VNet to 192.168.88.1 DNAT destination IP and description port.
      ;;; Product IPSec IKE and NAT-T - Strongswan VM Allow HTTP from Azure
      chain=input action=accept protocol=tcp src-address=100.64.0.18 dst-address=192.168.88.1 dst-port=80 log=no log-prefix=""
I think this part significantly changes the way newcomers view configuration of SNAT/DNAT IPSec connections.
Strongswan IPSec connection on Linux VM in Azure VNet:
conn azure-to-ilyas-homenetwork
  keyexchange=ikev2
  auto=start
  type=tunnel
  authby=psk

  left=%defaultroute              # This VM
  leftid=???                      # Azure Firewall Public IP
  leftsubnet=100.64.0.18/32       # With SNAT using Iptables Postrouting

  # Ilyas' Home Network
  right=???                       # Mikrotik Public IP
  rightsubnet=203.0.113.0/24      # With DNAT 203.0.113.10/32 -> 192.168.88.1/32 on Mikrotik

  ike=aes256-sha256-ecp384
  esp=aes256-sha256

  ikelifetime=30m                 # 1800 seconds
  lifetime=30m                    # 1800 seconds
  rekeymargin=3m                  # Start rekey 3 minutes before expiry (safe default)
  rekeyfuzz=10%

  dpdaction=restart
  dpddelay=10s
  dpdtimeout=30s

  keylife=3600s
IPSec connection status:
azure-to-ilyas-homenetwork[2]: ESTABLISHED 14 minutes ago, 10.1.1.66[<AZURE FIREWALL PUBLIC IP>]...145.249.252.49[<MIKROTIK PUBLIC IP>]
azure-to-ilyas-homenetwork{2}:  INSTALLED, TUNNEL, reqid 2, ESP in UDP SPIs: caf648c9_i 063ee2b2_o
azure-to-ilyas-homenetwork{2}:   100.64.0.18/32 === 203.0.113.0/24
Add Iptables NAT Postrouting rule:
sudo iptables -t nat -A POSTROUTING -s 10.1.1.66/32 -d 203.0.113.10/32 -j SNAT --to-source 100.64.0.18
sudo iptables -t nat -L POSTROUTING -n -v --line-numbers
Chain POSTROUTING (policy ACCEPT 0 packets, 0 bytes)
num   pkts bytes target     prot opt in     out     source               destination
1      108  6552 SNAT       all  --  *      *       10.1.1.66            203.0.113.10         to:100.64.0.18
Enjoy using SNAT and DNAT.
Mikrotik advanced logging
Always backup your Mikrotik configuration! Changing IPSec policy can break your network!
[admin@MikroTik] > /system logging print
Flags: X - disabled, I - invalid, * - default
 #    TOPICS                                             ACTION                                             PREFIX
 0  * info                                               memory
 1  * error                                              memory
 2  * warning                                            memory
 3  * critical                                           echo
[admin@MikroTik] > /system logging add topics=ipsec,!packet action=memory
[admin@MikroTik] > /system logging print
Flags: X - disabled, I - invalid, * - default
 #    TOPICS                                             ACTION                                             PREFIX
 0  * info                                               memory
 1  * error                                              memory
 2  * warning                                            memory
 3  * critical                                           echo
 4    ipsec                                              memory
      !packet
[admin@MikroTik] > /log print where topics~"ipsec"
[admin@MikroTik] > /system logging remove 4
Mikrotik On-Premise Possible Workarounds
If you IPSec tunnel was successfully established, but you can't access DNAT service - ensure you have enabled NAT-T on On-Premise side.
Diagnostics using xfrm:
$ sudo ip xfrm state
src 10.1.1.66 dst <ON-PREMISE-MIKROTIK-EXTERNAL-IP>
	proto esp spi 0x0317cad8 reqid 1 mode tunnel
	replay-window 0 flag af-unspec
	auth-trunc hmac(sha256) 0x94b874992006c60efa5dd659527a485afd30adecaa76f57e196ff1e984ea9a48 128
	enc cbc(aes) 0x1e3c453b1203c984a7975ef8119a27679eb975caac4d7d2dbd6bcd5ccfd63b98
	lastused 2025-05-20 10:30:41
	anti-replay context: seq 0x0, oseq 0x2, bitmap 0x00000000
src <ON-PREMISE-MIKROTIK-EXTERNAL-IP> dst 10.1.1.66
	proto esp spi 0xc85c33e1 reqid 1 mode tunnel
	replay-window 32 flag af-unspec
	auth-trunc hmac(sha256) 0x87b7d856b5cb2e3bb638fb46bfb454f7dff1793438d281d3ca2c19a8df9cefb7 128
	enc cbc(aes) 0xb2c7b544a286973fddbd3b2e412b0d88cdb3a162fde58e2ef9e29e16d17a7939
	anti-replay context: seq 0x0, oseq 0x0, bitmap 0x00000000
src 10.1.1.66 dst <ON-PREMISE-MIKROTIK-EXTERNAL-IP-VERIFIED>
	proto esp spi 0x0bce7f6e reqid 3 mode tunnel
	replay-window 0 flag af-unspec
	auth-trunc hmac(sha256) 0xa1619a4822467b5054441501c7ca1b44f8652d8a23a8ee39c005af498837f533 128
	enc cbc(aes) 0xa16601c7f5a705dca061c3b5464308f264922ea29befe9dfc8eb1edb60779ae7
	encap type espinudp sport 4500 dport 4500 addr 0.0.0.0
	anti-replay context: seq 0x0, oseq 0x0, bitmap 0x00000000
src <ON-PREMISE-MIKROTIK-EXTERNAL-IP-VERIFIED> dst 10.1.1.66
	proto esp spi 0xca3040e2 reqid 3 mode tunnel
	replay-window 32 flag af-unspec
	auth-trunc hmac(sha256) 0x3188da030f5d52546b0917e1dc266fa2523e386fdfb9f65339e6562f963a35b3 128
	enc cbc(aes) 0x46d89962c0d4ad6e46abd02c42b9ba60bec83b50c3e5716778039de1fa56c07a
	encap type espinudp sport 4500 dport 4500 addr 0.0.0.0
	anti-replay context: seq 0x0, oseq 0x0, bitmap 0x00000000
The first tunnel established but I can't connect DNAT service with it. The second tunnel established and works fine with DNAT. For the first tunnel transport protocol is set to ESP. No encapsulation (encap type not shown) → native IPsec (ESP directly over IP, proto 50). Likely direct connection (no NAT traversal). SPI: 0x0317cad8. Used recently (lastused exists). Works only for exact policy-matched traffic (e.g., maybe not DNAT).
FortiGate On-Premise Possible Workarounds
Some hardware firewalls like FortiGate will kill Phase2 if there is no traffic from your LAN for 1h (keylife=3600).
Working Phase2:
tunnel-to-partner[3]: ESTABLISHED 22 minutes ago, 10.1.1.66[<AZURE-FIREWALL-PUBLIC-IP>]...<ON-PREMISE-PUBLIC-IP>[...]
tunnel-to-partner{1}:  INSTALLED, TUNNEL, reqid 1, ESP in UDP SPIs: c5f47f3d_i 7712983b_o
tunnel-to-partner{1}:   <LINUX-VM-SNAT-IP> === <ON-PREMISE-DNAT-IP>
After some time Phase2 goes down:
tunnel-to-partner[3]: ESTABLISHED 35 minutes ago, 10.1.1.66[<AZURE-FIREWALL-PUBLIC-IP>]...<ON-PREMISE-PUBLIC-IP>[...]
Workaround using auto=route - installs a policy that automatically triggers the tunnel when traffic is sent.
auto=route
Execute ipsec status and you will see routed connections:
Routed Connections:
tunnel-to-partner{1}:  ROUTED, TUNNEL, reqid 1
tunnel-to-partner{1}:   <LINUX-VM-SNAT-IP> === <ON-PREMISE-DNAT-IP>
Some FortiGate firewall administrators recommend to disable DPD. But I do not.
If your on-prem peer (e.g., Cisco, MikroTik, FortiGate) does not accept incoming rekey requests, it will tear down the CHILD SA after keylife.
rekey=no # Disables Strongswan rekeying, let FortiGate rekey.
If FortiGate is broken and won’t reinitiate, then you must rekey from your side:
auto=start
rekey=yes
If CHILD SA (Phase 2) fails to establish because of incompatible proposals, specifically:
no acceptable DIFFIE_HELLMAN_GROUP found
no acceptable ENCRYPTION_ALGORITHM found
And FortiGate is proposing:
ESP: AES_CBC_256 / HMAC_SHA2_256_128 / ECP_384
Then in your /etc/ipsec.conf, locate your connection block and set:
esp=aes256-sha256-ecp384
# # Or to be more compatible set:
# esp=aes256-sha256-modp2048,aes256-sha256-ecp384
This ensures StrongSwan accepts what FortiGate proposes.
Additional information: Strongswan Rekeying Documentation
Monitoring Ipsec Connections
The vici plugin is a part of strongswan-swanctl package in Debian 12. This plugin is helpful for monitoring ipsec connections:
$ sudo apt install strongswan-swanctl
Edit /etc/strongswan.d/charon/vici.conf to enable TCP socket:
vici {
    load = yes
    socket = tcp://127.0.0.1:4502
}
Restart Ipsec:
$ sudo ipsec restart
Install Golang at least 1.21 to build ipsec prometheus exporter:
git clone https://github.com/torilabs/ipsec-prometheus-exporter.git
cd ./ipsec-prometheus-explorer
make build
Place your binary in a suitable location:
sudo cp ./ipsec-prometheus-exporter /usr/local/bin/
sudo chmod +x /usr/local/bin/ipsec-prometheus-exporter
Create systemd service file:
sudo vim /etc/systemd/system/ipsec-prometheus-exporter.service
Systemd service file contents:
[Unit]
Description=Ipsec Prometheus Exporter Service
After=network.target

[Service]
ExecStart=/usr/local/bin/ipsec-prometheus-exporter
Restart=on-failure
User=<username>
WorkingDirectory=/home/<username>
StandardOutput=journal
StandardError=journal

[Install]
WantedBy=multi-user.target
Reload systemd and start the service:
sudo systemctl daemon-reexec     # safer than daemon-reload
sudo systemctl daemon-reload
sudo systemctl enable ipsec-prometheus-exporter.service
sudo systemctl start ipsec-prometheus-exporter.service
Use ansible playbook to provision this service and binary to all hosts where needed.
Azure Loadbalancer For Strongswan VM
When you assign a public IP to an Azure VM, that public IP does not exist as an interface address on the VM. The VM only knows about its private IP (10.x/172.x/192.168.x). Azure performs 1:1 DNAT and SNAT at the virtual network edge, translating the public IP to the private IP.
- Outbound packets: Strongswan builds IKE packets with source = private IP because that’s what the OS sees.
- Remote peer sees packets coming from public IP because Azure NAT rewrites them.
This mismatch causes IKE authentication issues unless leftid is set correctly.
But even if you configure identities correctly, you hit the next problem: Azure Does Not Support ESP (IP Protocol 50) on VM Public IP and does not natively pass ESP protocol packets (IP protocol 50) to/from VM public IPs. It only supports TCP/UDP + ICMP. Strongswan without NAT-T: uses ESP for data plane traffic. ESP packets never reach your VM because Azure drops them at the virtual network edge.
When you put an Azure Load Balancer with the same public IP in front of the VM magic happens. Placing an Azure Load Balancer in front forces everything into UDP (NAT-T: UDP/4500) which Azure will forward, so the tunnel works:
- The LB only understands TCP/UDP, so ESP cannot be passed.
- This causes IKE negotiation to detect NAT and switch to NAT-T (UDP/4500).
- ESP is then encapsulated in UDP packets, which Azure forwards to your VM.
Everything works — even though you are still on Azure, because now ESP is no longer "raw protocol 50" but normal UDP.
resource "azurerm_public_ip" "ipsec_tunnels_prod_public_ip" {
  name                = "ipsec_tunnels_prod_public_ip"
  location            = data.azurerm_resource_group.main_rg.location
  resource_group_name = data.azurerm_resource_group.main_rg.name
  allocation_method   = "Static"
  sku                 = "Standard"
}
resource "azurerm_lb" "ipsec_tunnels_env_lb" {
  name                = "ipsec_tunnels_env_lb"
  location            = data.azurerm_resource_group.main_rg.location
  resource_group_name = data.azurerm_resource_group.main_rg.name
  sku                 = "Standard"

  frontend_ip_configuration {
    name                 = "ipsec_tunnels_env_frontend"
    public_ip_address_id = azurerm_public_ip.ipsec_tunnels_env_public_ip.id
  }
}
resource "azurerm_lb_nat_rule" "ipsec_tunnels_env_nat_rule_udp_500" {
  name                           = "ipsec_tunnels_env_nat_rule_udp_500"
  resource_group_name            = data.azurerm_resource_group.main_rg.name
  loadbalancer_id                = azurerm_lb.ipsec_tunnels_env_lb.id
  protocol                       = "Udp"
  frontend_port                  = 500
  backend_port                   = 500
  frontend_ip_configuration_name = "ipsec_tunnels_env_frontend"
}
resource "azurerm_lb_nat_rule" "ipsec_tunnels_env_nat_rule_udp_4500" {
  name                           = "ipsec_tunnels_env_nat_rule_udp_4500"
  resource_group_name            = data.azurerm_resource_group.main_rg.name
  loadbalancer_id                = azurerm_lb.ipsec_tunnels_env_lb.id
  protocol                       = "Udp"
  frontend_port                  = 4500
  backend_port                   = 4500
  frontend_ip_configuration_name = "ipsec_tunnels_env_frontend"
}
resource "azurerm_network_interface_nat_rule_association" "ipsec_tunnels_env_nat_rule_udp_500_association" {
  network_interface_id = azurerm_network_interface.ipsec_tunnels_env_nic.id
  ip_configuration_name = "ipsec_tunnels_env_ipconfig"
  nat_rule_id = azurerm_lb_nat_rule.ipsec_tunnels_env_nat_rule_udp_500.id
}
resource "azurerm_network_interface_nat_rule_association" "ipsec_tunnels_env_nat_rule_udp_4500_association" {
  network_interface_id = azurerm_network_interface.ipsec_tunnels_env_nic.id
  ip_configuration_name = "ipsec_tunnels_env_ipconfig"
  nat_rule_id = azurerm_lb_nat_rule.ipsec_tunnels_env_nat_rule_udp_4500.id
}
resource "azurerm_lb_backend_address_pool" "ipsec_tunnels_env_lb_backend" {
  name                = "ipsec_tunnels_env_lb_backend"
  loadbalancer_id     = azurerm_lb.ipsec_tunnels_env_lb.id
}
resource "azurerm_network_interface_backend_address_pool_association" "ipsec_tunnels_env_nic_association" {
  network_interface_id    = azurerm_network_interface.ipsec_tunnels_env_nic.id
  ip_configuration_name   = "ipsec_tunnels_env_ipconfig"
  backend_address_pool_id = azurerm_lb_backend_address_pool.ipsec_tunnels_env_lb_backend.id
}
resource "azurerm_lb_outbound_rule" "ipsec_tunnels_env_outbound_rule" {
  name                           = "ipsec_tunnels_env_outbound_rule"
  loadbalancer_id                = azurerm_lb.ipsec_tunnels_env_lb.id
  frontend_ip_configuration {
    name = "ipsec_tunnels_env_frontend"
  }
  protocol                       = "All"
  idle_timeout_in_minutes        = 4
  enable_tcp_reset               = true

  backend_address_pool_id = azurerm_lb_backend_address_pool.ipsec_tunnels_env_lb_backend.id
}
resource "azurerm_network_security_rule" "allow_ipsec_udp_from_lb_to_ipsec_tunnels_env" {
  name                        = "allow_ipsec_udp_from_lb_to_ipsec_tunnels_env"
  priority                    = 103
  direction                   = "Inbound"
  access                      = "Allow"
  protocol                    = "Udp"
  source_port_range           = "*"
  destination_port_ranges     = ["500", "4500"]
  source_address_prefix       = "*"
  destination_address_prefix  = azurerm_network_interface.ipsec_tunnels_env_nic.private_ip_address
  resource_group_name         = data.azurerm_resource_group.main_rg.name
  network_security_group_name = azurerm_network_security_group.vpn_env_nsg.name
  description                 = "Allow IPsec UDP ports 500 and 4500 from Load Balancer to ipsec_tunnels_env_vm"
}
resource "azurerm_linux_virtual_machine" "ipsec_tunnels_env_vm" {
  name                = "ipsec_tunnels_env_vm"
  computer_name       = "IpsecTunnelsVm"
  location            = data.azurerm_resource_group.main_rg.location
  resource_group_name = data.azurerm_resource_group.main_rg.name
  size                = "Standard_D2ds_v4"
  admin_username      = "azureuser"
  disable_password_authentication = true

  network_interface_ids = [azurerm_network_interface.ipsec_tunnels_env_nic.id]

  os_disk {
    caching              = "ReadWrite"
    storage_account_type = "Standard_LRS"
  }

  source_image_reference {
    publisher = "Canonical"
    offer     = "0001-com-ubuntu-server-jammy"
    sku       = "22_04-lts-gen2"
    version   = "latest"
  }

  admin_ssh_key {
    username = "azureuser"
    public_key = file("~/.ssh/id_rsa.pub")
  }

  tags = {
    environment = "env"
    purpose = "IPSec Tunnels for PNR"
  }
}
Azure Virtual Network Gateway & On-Premise Datacenter
Important: Azure Virtual Network Gateway connections does not support Traffic Selectors for IPSec Policy based tunnels when at least one SNAT Egress/Ingress rule attached. That makes Azure Virtual Network Gateway useless when On-Premise networks has the same subnet address range as your Azure VNet has. For example
10.0.0.0/16for both sides!
To achieve one-way access — where my Azure Kubernetes pods can connect to the partner's on-prem RabbitMQ, but they cannot initiate connections back to my hosts or pods — I should use a site-to-site IPsec VPN with asymmetric routing and strict firewall controls on my side.
My Side (Azure)                      Their Side (On-Premise)
------------------                   ----------------------
AKS Pods (RabbitMQ client)           RabbitMQ Server (on-prem)
    ↓                                      ↑
Azure VNet                           On-Prem Network (e.g., 192.168.100.0/24)
    ↓                                      ↑
Azure VPN Gateway  --------------->  On-Prem VPN device (e.g., pfSense, Cisco)
    ↕
Optional: Azure Firewall (SNAT or filtering)
Create Public IP And VPN Gateway subnet
resource "azurerm_public_ip" "partners_vpn_gateway_dev_public_ip" {
  name                = "partners_vpn_gateway_dev_public_ip"
  location            = data.azurerm_resource_group.main_rg.location
  resource_group_name = data.azurerm_resource_group.main_rg.name
  allocation_method   = "Static"
  sku                 = "Standard"
}
resource "azurerm_subnet" "vpn_gateway_dev" {
  name                 = "GatewaySubnet"
  resource_group_name  = data.azurerm_resource_group.main_rg.name
  virtual_network_name = azurerm_virtual_network.vnet_dev.name
  address_prefixes     = ["10.1.0.0/24"]
}
Create Azure Virtual Network Gateway
To create a Virtual Network Gateway you should have at least Network Contributor role assigned in Azure subscriptions.
Virtual network gateway can not be created if the virtual network already uses remote gateways over peering. You cannot have both a Virtual Network Gateway and a Virtual Hub (from Azure Virtual WAN) on the same virtual network (VNet).
Azure Virtual WAN abstracts the underlying VNets and uses its own Virtual Hub architecture, which is different from the classic Virtual Network Gateway setup. Once a VNet is connected to a Virtual WAN hub, you no longer need (or can have) a VPN Gateway or ExpressRoute Gateway in that VNet.
You must migrate your Azure Point-to-Site VPN to Virtual Network Gateway before building Site-to-Site IPSec VPN connection.
| Scenario | Virtual WAN (with Virtual Hub) | Virtual Network Gateway (Traditional) |
|---|---|---|
| VNet directly contains VPN Gateway | Not allowed | Allowed |
| VNet connected to Virtual Hub | Allowed | You cannot add a VPN Gateway to this VNet |
| Point-to-Site VPN support | Yes, via Virtual Hub | Yes, via Gateway |
| Can coexist in same VNet | No | Only one VPN Gateway per VNet |
resource "azurerm_virtual_network_gateway" "partners_vpn_gateway_dev" {
  name                = "partners_vpn_gateway_dev"
  location            = data.azurerm_resource_group.main_rg.location
  resource_group_name = data.azurerm_resource_group.main_rg.name
  type                = "Vpn"
  vpn_type            = "RouteBased"
  active_active       = false
  enable_bgp          = false
  sku                 = "VpnGw2"

  ip_configuration {
    name                          = "vnetGatewayConfig"
    public_ip_address_id          = azurerm_public_ip.partners_vpn_gateway_dev_public_ip.id
    private_ip_address_allocation = "Dynamic"
    subnet_id                     = azurerm_subnet.vpn_gateway_dev.id
  }
}
Basic SKU ~8 minutes. VpnGw1AZ ~28 minutes.
A virtual network gateway SKU of Standard or higher is required for Ipsec Policies support on virtual network gateway. Upgrade from Basic SKU not allowed. Actually you can't use Standard SKU too. The allowed SKUs are VpnGw1AZ, VpnGw2AZ, VpnGw3AZ, VpnGw4AZ, VpnGw5AZ, VpnGw1, VpnGw2, VpnGw3, VpnGw4, VpnGw5. Standard Public IPs associated with VPN gateways with non-AZ VPN SKU cannot have zones configured, forcing to use VpnGw?AZ SKU or disable zones in IP configuration.
Public IP Standard SKU + Zones and VpnGw?AZ or Public IP Standard SKU and VpnGw1.
VpnGw1is not supportingSNAT!
Create Local Network Gateway in Azure
Create a local network gateway to represent the on-premises site that you want to connect to a virtual network. The local network gateway specifies the public IP address of the VPN device and IP address ranges located on the on-premises site.
resource "azurerm_local_network_gateway" "partners_onprem_local_network_gateway_dev" {
  name                = "partners_onprem_local_network_gateway_dev"
  location            = data.azurerm_resource_group.main_rg.location
  resource_group_name = data.azurerm_resource_group.main_rg.name
  gateway_address     = "???.???.???.???" # The remote gateway IP address to connect with.

  address_space = ["198.???.???.???/32"] # The list of string CIDRs representing the address spaces the gateway exposes.
}
Azure VM with IP 10.1.2.66 will have its source IP translated to an address in 100.???.???.???/29 when traffic goes out through the IPsec tunnel. The on-premises side will see traffic coming from 100.???.???.???, not 10.1.2.66. On the on-prem side, they must accept and route return traffic to 100.???.???.???/29.
Create Azure Virtual Network Gateway Connection
Obtain Details from Partner Company.
- Public IP of their VPN device
- On-prem CIDRs (e.g., 192.168.100.0/24)
- IPsec/IKE parameters:
- IKE version (IKEv2 recommended)
- Pre-shared key (PSK)
- Encryption/integrity algorithms
- DH Group (e.g., Group 14, 20)
- Lifetime
Ask if they can whitelist your IPs (e.g., NATed IP if needed).
Usually you will receive a document with IPSec policy connection parameters. In those documents ipsec_integrity often called Hash algorithm, and pfs_group will be a Diffie-Hellman group for PFS or Perfect Forward Secrecy.
Create a VPN gateway connection between the virtual network gateway for the virtual network, and the local network gateway for the on-premises site.
resource "azurerm_virtual_network_gateway_connection" "partners_onprem_vpn_connection" {
  name                            = "partner_vpn_connection"
  location                        = data.azurerm_resource_group.main_rg.location
  resource_group_name             = data.azurerm_resource_group.main_rg.name
  type                            = "IPsec"
  connection_protocol             = "IKEv2"
  virtual_network_gateway_id      = azurerm_virtual_network_gateway.partners_vpn_gateway_dev.id
  local_network_gateway_id        = azurerm_local_network_gateway.pertners_onprem_local_network_gateway_dev.id
  shared_key                      = var.shared_key
  enable_bgp                      = false
  use_policy_based_traffic_selectors = false

  ipsec_policy {
    sa_lifetime            = 86400
    sa_datasize            = 102400000
    ipsec_encryption       = "AES256"
    ipsec_integrity        = "SHA256"
    ike_encryption         = "AES256"
    ike_integrity          = "SHA256"
    dh_group               = "ECP384"
    pfs_group              = "ECP384"
  }
}
In typical IPsec VPN setups between your infrastructure and a partner/provider, the pre-shared key (PSK) is mutually agreed upon — it’s not autogenerated unless you both support some automation tooling or use certificates. You need to coordinate with partner to either: receive a PSK from them, or propose one yourself and send it to them securely (e.g., via encrypted email or secure portal).
This is how you can generate shared key for now:
$ openssl rand -base64 32
In some documents you will see Authenticated ESP Tunnel requirement. It means that ipsec_policy with encryption & integrity must be set in virtual network connection.
Parameter breakdown by Phase
| Parameter | Value | Phase | Description |
|---|---|---|---|
| sa_lifetime_sec | 3600 | 2 | IPsec SA lifetime in seconds. |
| sa_data_size_kb | 102400000 | 2 | Maximum volume of data before rekeying (IPsec). |
| ipsec_encryption | AES256 | 2 | Encryption algorithm for IPsec tunnel. |
| ipsec_integrity | SHA256 | 2 | Integrity algorithm for IPsec. |
| ike_encryption | AES256 | 1 | Encryption for IKE (control plane tunnel). |
| ike_integrity | SHA256 | 1 | Integrity check for IKE messages. |
| dh_group | ECP384 | 1 | Diffie-Hellman group for IKE key exchange. |
| pfs_group | ECP384 | 2 | DH group used for Perfect Forward Secrecy in IPsec tunnel (child SA). |
SKU Limits
| SKU | Max Site-to-Site Tunnels |
|---|---|
| VpnGw1 | 10 |
| VpnGw2 | 30 |
| VpnGw3 | 30 |
| VpnGw5 | 100 |
Traffic Routing
When you create Local Network Gateway the Azure automatically add effective routes to the network interfaces. In most cases you do not need to add user defined routes (UDR).
$ az network nic show-effective-route-table --name <NIC NAME> --resource-group <RG NAME>
Gateway SNAT for VM
If you have network overlaping when your Azure cloud VNet and partner's On-Premise DC both use 10.0.0.0/24 - You should make all traffic from your Azure side (e.g., VMs or AKS pods) appear to come from the IP range for example 100.64.0.16/29 when it goes through the IPsec tunnel. This avoids IP overlap and simplifies their side.
Important: Azure Virtual Network Gateway does not support SNAT for Policy-based IPSec Tunnels! Use Azure Linux VM with Strongswan and Iptables in that case.
NAT rules only work in route-based VPN gateways (VpnGw1+).
NAT rules do not support port-level translation — they only apply to IP-level NAT.
Create Azure Network Gateway SNAT Egress rule.
data "azurerm_virtual_network_gateway" "vpn_gateway_dev" {
  name                = azurerm_virtual_network_gateway.vpn_gateway_dev.name
  resource_group_name = data.azurerm_resource_group.main_rg.name
}

resource "azurerm_virtual_network_gateway_nat_rule" "snat_example" {
  name                       = "snat-rule"
  resource_group_name        = data.azurerm_resource_group.main_rg.name

  virtual_network_gateway_id = azurerm_virtual_network_gateway.vpn_gateway_dev.id
  ip_configuration_id        = data.azurerm_virtual_network_gateway.vpn_gateway_dev.ip_configuration[0].id
  mode                       = "EgressSnat"
  type                       = "Dynamic"

  external_mapping {
    address_space = "100.64.0.18/32"    # External SNAT IP your packets must have while outgoing.
  }

  internal_mapping {
    address_space = "10.1.2.0/24"       # Internal VM Private IP
  }
}
NAT works per connection, so you must associate NAT rules with VPN Connections, not the gateway alone.
Add your SNAT rule to the azurerm_virtual_network_gateway_connection resource.
...
  egress_nat_rule_ids = [
    azurerm_virtual_network_gateway_nat_rule.snat_example.id,
  ]
Optional extras
Strongswan Packages In Debian 12
| Use Case | Install Package |
|---|---|
| X.509 certificate-based VPN | (included in base strongswan) |
| EAP (e.g., EAP-MSCHAPv2) | sudo apt install libstrongswan-extra-plugins |
| SQLite/MySQL/LDAP backends | sudo apt install libstrongswan-standard-plugins |
| VICI interface (e.g. for swanctl) | sudo apt install strongswan-swanctl |
| NM integration | sudo apt install network-manager-strongswan |
Knowledge Section
IKE Phase 1
IKE (Internet Key Exchange) Phase 1 is the first step in establishing a secure IPsec VPN tunnel. Its goal is to: Authenticate both VPN peers. Negotiate a shared secret (encryption keys). Create a secure and encrypted channel (ISAKMP SA) to use in Phase 2 (which negotiates actual IPsec settings for data traffic).
ike=aes256-sha256-ecp384
This defines the IKE Security Association (SA) parameters used in Phase 1 (IKE_SA_INIT and IKE_AUTH).
- aes256: AES encryption with a 256-bit key
- sha256: HMAC-SHA-256 for integrity and authentication
- ecp384: ECP (Elliptic Curve Group) over a 384-bit prime field (i.e., NIST P-384, also known as curve P-384) for Diffie–Hellman key exchange
Together, this ensures strong encryption, integrity, and perfect forward secrecy using elliptic curve DH.
ESP Phase 2
esp=aes256-sha256-ecp384
This defines the IPsec (ESP) Security Association parameters used in Phase 2 (CHILD_SA).
- aes256: AES encryption with 256-bit key (for data encryption)
- sha256: HMAC-SHA-256 (for data integrity and authentication)
- ecp-384: ECP-384 (P-384) for Diffie–Hellman during CHILD_SA setup
These algorithms protect the actual payload traffic that traverses the tunnel and it will enforce PFS (Perfect Forward Secrecy) for the CHILD_SA.
Diffie-Hellman (DH) in IKE
Diffie-Hellman (DH) is a key exchange algorithm used during IKE Phase 1 to securely derive a shared secret key over an untrusted network without transmitting the actual key. The DH Group defines the strength of the algorithm — bigger group numbers mean stronger (but slower) cryptographic operations.
Dellie-Hellman (DH) Group 14 vs Group 15
| Group | Key Type | Key Size | Strength | Performance | Curve Type |
|---|---|---|---|---|---|
| 14 | Modular Exponentiation | 2048 bits | Strong | Faster | Classic DH |
| 15 | Modular Exponentiation | 3072 bits | Very Strong | Slower | Classic DH |
Group 14 – 2048-bit key is strong enough for most production-grade VPNs. Widely supported (Azure, Cisco, Mikrotik, etc.). Balanced between security and performance. Use Group 14 for compatibility and speed, while still maintaining strong security.
Group 15 – 3072-bit key is more secure due to longer key size. Slightly more CPU-intensive (slower negotiation). Might not be supported by all legacy VPN devices. Use Group 15 if both sides support it and performance is acceptable.
Never use older/smaller groups (like Group 1 or Group 5) — they are no longer secure.
DH Groups Supported in Azure VPN Gateway:
| Group Name | Azure VPN Gateway Support |
|---|---|
| Group 14 (DHGroup2048) | Supported |
| Group 15 | Not Supported |
| Group 20 (ECP384) | Supported |
| Group 2 | Legacy Support (not recommended) |
More information: RFC3526, RFC5114
PFS Group Mapping
| Terraform | Meaning | Key Size | Standard Group |
|---|---|---|---|
| PFS1 | Diffie-Hellman Group 1 | 768-bit | Group 1 |
| PFS2 | Diffie-Hellman Group 2 | 1024-bit | Group 2 |
| PFS14 | Diffie-Hellman Group 14 | 2048-bit | Group 14 |
| PFS2048 | MODP 2048-bit (RFC 3526) | 2048-bit | Group 14 (same as PFS14) |
| PFS24 | MODP-2048-256 (RFC 5114) | 2048-bit (RFC 5114) | Group 24 |
| ECP256 | Elliptic Curve Group 19 | 256-bit | Group 19 |
| ECP384 | Elliptic Curve Group 20 | 384-bit | Group 20 |
| PFSMM | Microsoft proprietary | (custom) | N/A |
| None | No Perfect Forward Secrecy | Not secure | N/A |
GRE Over IPsec
GRE over IPsec is a hybrid VPN tunneling method that combines GRE (Generic Routing Encapsulation) - a lightweight, flexible tunnel protocol. And IPsec (Internet Protocol Security) - provides strong encryption, integrity, and authentication.
[ Host A ] <---> [GRE Tunnel over IPsec] <---> [ Host B ]
GRE Tunnel encapsulates inner traffic (any IP, multicast, routing protocols) the original payload (any protocol). Then the GRE packet is wrapped inside an IPsec tunnel (ESP, tunnel mode). The IPsec layer encrypts and authenticates the GRE packet. Result: secure + routable + flexible tunnel
GRE allows you to run protocols like OSPF, BGP, EIGRP (dynamic routing). GRE can carry multicast/broadcast, which IPsec alone cannot. GRE has no built-in security; pairing it with IPsec fixes that.
Original Packet (e.g., ICMP, TCP, BGP)
   ↓
GRE Encapsulation
   ↓
IPsec Encapsulation (ESP in Tunnel Mode)
   ↓
Encrypted GRE packet transmitted over the internet
Azure VPN Gateway and Azure Firewall have no GRE support. Set up a Linux VM in Azure to terminate GRE and IPsec (Azure VPN Gateway does not support GRE natively). Establish an IPsec tunnel using strongSwan or Libreswan. Create a GRE interface on top of the IPsec connection. Route your internal traffic via GRE IPs securely tunneled through IPsec.
Required Ports For IPsec/IKEv2
| Protocol | Port(s) | Description |
|---|---|---|
| UDP | 500 | IKEv2 Phase 1 |
| UDP | 4500 | NAT-T (when behind NAT) |
| ESP | IP Proto 50 | IPsec Phase 2 (ESP tunnel) |
Important ESP Limitation in Azure Firewall: Azure Firewall does not support IP protocol 50 (ESP) in the network rule collection — only TCP/UDP traffic.
resource "azurerm_route_table" "firewall-rt" {
  name                = "firewall-rt"
  location            = data.azurerm_resource_group.main_rg.location
  resource_group_name = data.azurerm_resource_group.main_rg.name

  ...

  route {
    name                = "bypass-firewall-for-esp-protocol"
    address_prefix      = "145.249.252.49/32" # Router Public IP (Mikrotik)
    next_hop_type       = "Internet"
  }
DER Certificate Format
From PEM to DER. If you already have a PEM-formatted certificate (.pem, .crt, or .cer with Base64 encoding):
$ openssl x509 -in certificate.pem -outform der -out certificate.der
This will produce a binary DER-encoded certificate (certificate.der), which you can rename to certificate.cer if Azure expects a .cer extension.
From PFX to DER. If you have a .pfx (PKCS#12) file and want to extract just the certificate:
openssl pkcs12 -in certificate.pfx -clcerts -nokeys -out certificate.pem
openssl x509 -in certificate.pem -outform der -out certificate.cer
The first command extracts the certificate in PEM. The second converts it to DER (binary .cer).
Links
Virtual Networks & GRE Support
About cryptographic requirements and Azure VPN gateways
Azure Training: On-Premises Network Connection
Azure Support
Note: NAT limitations and considerations
- NAT is supported on the following SKUs: VpnGw2
5, VpnGw2AZ5AZ. - NAT is supported for IPsec/IKE cross-premises connections only. VNet-to-VNet connections or P2S connections aren't supported.
- NAT rules aren't supported on connections that have Use Policy Based Traffic Selectors enabled.
- The maximum supported external mapping subnet size for Dynamic NAT is /26.
- Port mappings can be configured with Static NAT types only. Dynamic NAT scenarios aren't applicable for port mappings.
- Port mappings can't take ranges at this time. Individual port needs to be entered.
- Port mappings can be used for both TCP and UDP protocols.
- Please find below link for your reference.
If Port mappings can be configured with Static NAT types only. Dynamic NAT scenarios aren't applicable for port mappings.
If you continue to experience issues, it may be beneficial to check whether the on-premises VPN device is validated and correctly configured, as this can also impact the stability of the VPN connection.
Azure Alternatives
| Method | Notes |
|---|---|
| Site-to-Site IPsec VPN | Best for production, scalable. |
| Point-to-site VPN | Not ideal for Pods, manual mgmt. |
| Application-layer proxy | Less secure, breaks transparency. |
| Private Link (if in Azure) | Not applicable to on-prem. |
AWS IPSec Tunnels
AWS Virtual Private Gateway (VGW) does not support IKEv2. It supports only IKEv1 (main mode).
AWS VPN has 2 layers:
- Encrypted outer layer (public Internet): Uses the "outside" IPs. This is where IKE and ESP packets travel.
- Inside the encryption. Runs a private link (a /30 network). Uses the "inside" IPs.
IPSec Terraform Module
Create new Terraform module called ipsec_tunnel in ./modules/ subdirectory.
Customer Gateway with remote router public IP:
resource "aws_customer_gateway" "this" {
  bgp_asn    = 65000                    # arbitrary private ASN
  ip_address = var.remote_public_ip
  type       = "ipsec.1"
  tags = {
    Name = "${var.env}-remote-cgw"
  }
}
Virtual Private Gateway attached to your VPC:
resource "aws_vpn_gateway" "this" {
  vpc_id          = var.vpc_id
  amazon_side_asn = 64512
  tags = {
    Name = "${var.env}-vgw"
  }
}
VPN connection (two tunnels automatically created):
resource "aws_vpn_connection" "this" {
  customer_gateway_id = aws_customer_gateway.this.id
  vpn_gateway_id      = aws_vpn_gateway.this.id
  type                = "ipsec.1"

  # use static routes (simpler for MikroTik)
  static_routes_only = true

  tags = {
    Name = "${var.env}-vpn"
  }
}
Add remote subnet(s) as VPN connection routes:
resource "aws_vpn_connection_route" "remote" {
  count               = length(var.remote_cidrs)
  vpn_connection_id   = aws_vpn_connection.this.id
  destination_cidr_block = var.remote_cidrs[count.index]
}
Route in VPC route table(s) for remote subnets via VGW:
resource "aws_route" "to_remote" {
  for_each = toset(var.route_table_ids)
  route_table_id         = each.value
  destination_cidr_block = var.remote_cidrs[0] # if you have more, duplicate or adjust logic
  gateway_id             = aws_vpn_gateway.this.id
}
Create outputs.tf:
output "vpn_connection_id" {
  value = aws_vpn_connection.this.id
}

output "vpn_tunnel1_address" {
  value = aws_vpn_connection.this.tunnel1_address
}

output "vpn_tunnel2_address" {
  value = aws_vpn_connection.this.tunnel2_address
}

output "vpn_customer_gateway_config_xml" {
  value     = aws_vpn_connection.this.customer_gateway_configuration
  sensitive = true
}
Create variables.tf:
variable "env" {
  description = "Environment name (dev/prod/etc)"
  type        = string
}

variable "vpc_id" {
  description = "VPC ID where VGW attaches"
  type        = string
}

variable "remote_public_ip" {
  description = "Public IP of your remote hardware router"
  type        = string
}

variable "remote_cidrs" {
  description = "List of CIDRs from remote to make reachable"
  type        = list(string)
}

variable "route_table_ids" {
  description = "List of route table IDs in VPC that should route remote traffic to the VGW"
  type        = list(string)
}
Environment Implementation
Create new ipsec.tf in ./envs/dev/ subdirectory:
module "ipsec_tunnel" {
  source = "../../modules/ipsec_tunnel"

  env               = var.env
  vpc_id            = module.vpc.vpc_id
  remote_public_ip  = "???"
  remote_cidrs      = ["???"]
  route_table_ids   = module.vpc.private_route_table_ids
}

output "ipsec_tunnel_connection_id" {
  value = module.ipsec_tunnel.vpn_connection_id
}

output "ipsec_tunnel_tunnels" {
  value = {
    tunnel1 = module.ipsec_tunnel.vpn_tunnel1_address
    tunnel2 = module.ipsec_tunnel.vpn_tunnel2_address
  }
}

output "ipsec_tunnel_config_xml" {
  value     = module.ipsec_tunnel.vpn_customer_gateway_config_xml
  sensitive = true
}
Apply Terraform configuration:
terraform apply
terraform output -raw ipsec_tunnel_config_xml > ~/tmp/ipsec_config.xml
XML Explanation
Lets inspect XML configuration:
<vpn_connection id="vpn-072cb2d63f48e51e3">
  <customer_gateway_id>cgw-0878b1ede53984328</customer_gateway_id>
  <vpn_gateway_id>vgw-0bab7a43ee73c2545</vpn_gateway_id>
  <vpn_connection_type>ipsec.1</vpn_connection_type>
  <vpn_connection_attributes>NoBGPVPNConnection</vpn_connection_attributes>
  <ipsec_tunnel>
    <customer_gateway>
      <tunnel_outside_address>
        <ip_address>4.185.86.17</ip_address>
      </tunnel_outside_address>
      <tunnel_inside_address>
        <ip_address>169.254.149.214</ip_address>
        <network_mask>255.255.255.252</network_mask>
        <network_cidr>30</network_cidr>
      </tunnel_inside_address>
    </customer_gateway>
    <vpn_gateway>
      <tunnel_outside_address>
        <ip_address>15.236.58.209</ip_address>
      </tunnel_outside_address>
      <tunnel_inside_address>
        <ip_address>169.254.149.213</ip_address>
        <network_mask>255.255.255.252</network_mask>
        <network_cidr>30</network_cidr>
      </tunnel_inside_address>
    </vpn_gateway>
    <ike>
      <authentication_protocol>sha1</authentication_protocol>
      <encryption_protocol>aes-128-cbc</encryption_protocol>
      <lifetime>28800</lifetime>
      <perfect_forward_secrecy>group2</perfect_forward_secrecy>
      <mode>main</mode>
      <pre_shared_key>...</pre_shared_key>
    </ike>
    <ipsec>
      <protocol>esp</protocol>
      <authentication_protocol>hmac-sha1-96</authentication_protocol>
      <encryption_protocol>aes-128-cbc</encryption_protocol>
      <lifetime>3600</lifetime>
      <perfect_forward_secrecy>group2</perfect_forward_secrecy>
      <mode>tunnel</mode>
      <clear_df_bit>true</clear_df_bit>
      <fragmentation_before_encryption>true</fragmentation_before_encryption>
      <tcp_mss_adjustment>1379</tcp_mss_adjustment>
      <dead_peer_detection>
        <interval>10</interval>
        <retries>3</retries>
      </dead_peer_detection>
    </ipsec>
  </ipsec_tunnel>
  <ipsec_tunnel>
    <customer_gateway>
      <tunnel_outside_address>
        <ip_address>4.185.86.17</ip_address>
      </tunnel_outside_address>
      <tunnel_inside_address>
        <ip_address>169.254.124.222</ip_address>
        <network_mask>255.255.255.252</network_mask>
        <network_cidr>30</network_cidr>
      </tunnel_inside_address>
    </customer_gateway>
    <vpn_gateway>
      <tunnel_outside_address>
        <ip_address>52.47.186.123</ip_address>
      </tunnel_outside_address>
      <tunnel_inside_address>
        <ip_address>169.254.124.221</ip_address>
        <network_mask>255.255.255.252</network_mask>
        <network_cidr>30</network_cidr>
      </tunnel_inside_address>
    </vpn_gateway>
    <ike>
      <authentication_protocol>sha1</authentication_protocol>
      <encryption_protocol>aes-128-cbc</encryption_protocol>
      <lifetime>28800</lifetime>
      <perfect_forward_secrecy>group2</perfect_forward_secrecy>
      <mode>main</mode>
      <pre_shared_key>...</pre_shared_key>
    </ike>
    <ipsec>
      <protocol>esp</protocol>
      <authentication_protocol>hmac-sha1-96</authentication_protocol>
      <encryption_protocol>aes-128-cbc</encryption_protocol>
      <lifetime>3600</lifetime>
      <perfect_forward_secrecy>group2</perfect_forward_secrecy>
      <mode>tunnel</mode>
      <clear_df_bit>true</clear_df_bit>
      <fragmentation_before_encryption>true</fragmentation_before_encryption>
      <tcp_mss_adjustment>1379</tcp_mss_adjustment>
      <dead_peer_detection>
        <interval>10</interval>
        <retries>3</retries>
      </dead_peer_detection>
    </ipsec>
  </ipsec_tunnel>
</vpn_connection>
| Type | Example IPs | Use in Policy? | Purpose |
|---|---|---|---|
| Public (outside) | 4.185.86.17 -- 15.236.58.209 | Yes, as sa-src / sa-dst | Actual encrypted tunnel endpoints |
| Private (inside) | 169.254.149.214 -- 169.254.149.213 | No | Internal point-to-point link for routing |
| LAN/VPC networks | 192.168.88.0/24 -- 10.0.0.0/16 | Yes, as src / dst | What the IPsec tunnel actually carries |
Mikrotik Configuration - IPSec
IPSec policies define how traffic will be routed from Mikrotik:
A  aws yes <MIKROTIK-DNAT-IP-ADDRESS>                    <AWS-VPC-CIDR-BLOCK>                          all
A  aws yes <MIKROTIK-LAN-INTERNAL-SERVER-IP>             <AWS-VPC-CIDR-BLOCK>                          all
Proposal:
name="proposal" auth-algorithms=sha1 enc-algorithms=aes-128-cbc lifetime=1h pfs-group=modp1024
Profile:
name="profilename" hash-algorithm=sha1 enc-algorithm=aes-128 dh-group=modp1024 lifetime=1d
proposal-check=obey nat-traversal=yes dpd-interval=2m dpd-maximum-failures=5
Identity:
peer=peername auth-method=pre-shared-key secret="???"
generate-policy=no
Peer, TUNNEL-OUTSIDE-ADDRESS can be found in gateway XML configuration output from Terraform.
name="peername" address=<TUNNEL-OUTSIDE-ADDRESS> local-address=<mikrotik-public-ip> profile=profilename
exchange-mode=main send-initial-contact=yes
Mikrotik Configuration - Firewall
Filter:
chain=input action=accept protocol=udp src-address=<TUNNEL-OUTSIDE-ADDRESS> dst-port=500,4500 log=no log-prefix=""
chain=input action=accept protocol=tcp src-address=<AWS-VPC-CIDR-BLOCK> dst-address=<MIKROTIK-LAN-INTERNAL-SERVER-IP> dst-port=80 log=no
log-prefix=""
Nat:
chain=dstnat action=dst-nat to-addresses=<MIKROTIK-LAN-INTERNAL-SERVER-IP> to-ports=80 protocol=tcp src-address=<AWS-VPC-CIDR-BLOCK>
dst-address=<MIKROTIK-DNAT-IP-ADDRESS> dst-port=8080 log=no log-prefix=""
Kubernetes services will connect to port 8080 and Mikrotik will translate it to local port 80 somewhere in Mikrotik LAN.
Debugging AWS IPSec Gateway
Connect Mikrotik with SSH and execute:
/ip ipsec peer print detail
/ping 13.37.205.240 src-address=145.249.252.49
/tool traceroute address=13.37.193.147 src-address=145.249.252.49
/tool sniffer quick interface=ether1 ip-address=<ADDRESS>
/ip firewall nat print
/tool sniffer quick ip-protocol=tcp port=80
/tool sniffer quick port=8080
/tool sniffer quick ip-address=10.10.0.0/16
aws ec2 describe-route-tables --filters "Name=association.subnet-id,Values=subnet-0559e67986b5d6b8a"
Check routing from Kubernetes pod:
root@debian-diag:/# ip route get 172.X.X.X
172.X.X.X via 169.254.1.1 dev eth0 src 10.10.13.105 uid 0
    cache
That means pod routes everything to the Kubernetes node. The node must decide whether traffic enters the AWS IPsec tunnel:
Pod (10.10.13.105)
  -> Node via 169.254.1.1
      -> Host routing lookup
          -> dev-ipsec-tunnel (if configured correctly)
              -> Remote subnet 172.X.X.X